5.17.2012

magic plan


If there's one phone app I would highly recommend to ANY homeowner, it would be Magic Plan. The simple fact that you can easily get an accurate drawing of your floor plan for free with very little effort FROM YOUR PHONE shows how far technology has come.

The app is very easy to use with instructional videos built right in.


Once you've finished, it can send you a PDF, JPEG, or even a DXF (for you CAD folks) to your email.


Even before calibrating the app, the thing is pretty accurate. Even the auto-correct features work quite seamlessly. Check out the app if you have any interest in remodeling, reorganizing, or simply knowing wall lengths for paint, furniture, etc. Ever been out looking at furniture and knew exactly where you wanted to put it, but wasn't sure how it would fit. Now you have that info. On your phone. In your pocket. You'll love it.

5.14.2012

making fire from light


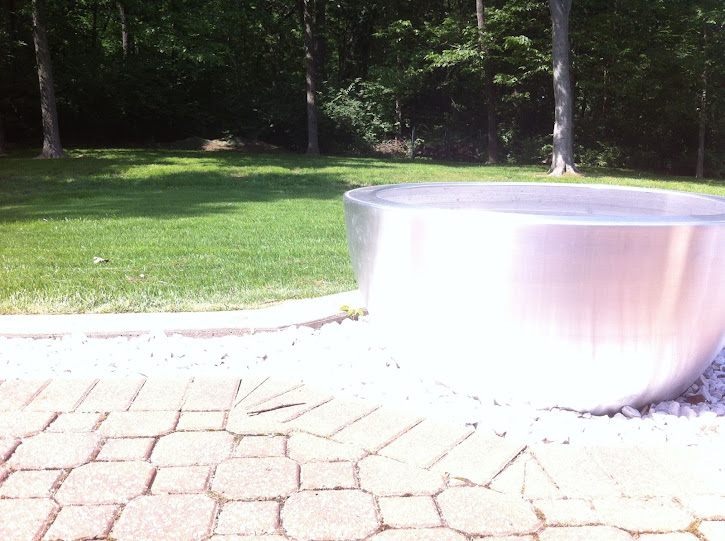
We recently released a group of new lighting products at work. A pretty awesome group if I must say so myself. This group included the 40" diameter fixture you can see above. We're having difficulty getting quality parts from the spinning company, but this isn't all bad news (for me at least). We were left with several parts to scrap so I scooped one up and threw it in my car to haul home. This thing is massive. If it were ANY larger I doubt I could have thrown it in my hatchback. Anyway, I had originally planned to get it painted and complete the part as a light fixture, replacing the ceiling fan in my living room. After some thought, I decided not to go through with that plan. It's so large that even in my living room with vaulted ceilings it might look out of place. And I definitely didn't want to block any light coming in the skylights. So on to Plan B:


My back patio was in desperate need of a fire pit. It already had the perfect paver layout for one. All it took to install was digging up some mulch that was in the way, dropping this guy in and filling it with a ton of rock (scavenged from the front patio) and topped with the same white marble rock along the patio perimeter to get the fire surface about 6" from the top. I'm hoping that will help keep the heat from doing damage to the piece.

5.13.2012

feelin' the blues


Blue has always been my favorite color. And I've always enjoyed a good thunderstorm. So when I ran across this color named "Rain Storm" it was basically fate that I would like the color enough to smack it on at least one of my walls. Just look at it. It's freakin' perfect.

beauty in simple things


I found this console table on my favorite online shopping site and was excited to see the $20 asking price. When I picked it up, the entire table had this worn, cracked finish that you can see above. I had originally planned to sand down and paint the entire table, but that distressed look started to grow on me. So I grabbed a sample size container of Tangerine Tango paint (you got me Pantone) and just painted the inner bottom surface and two inner sides. I painted the upper inside surface white to help reflect light onto the brightly-colored surfaces. Once I finished the inside I decided I'd let it sit for a few days and see if I still had any interest in doing the outside... Nope. The cracked outer finish resembling distressed wood with the black steel hair-pin legs and and bright color on the inside all seem to work perfectly together. Such a simple table that I like so much.


dining table chairs


Not too long ago I purchased some knock-off Eames shell dining chairs for my dining table. The price compared to Herman Miller retail was laughable... so after a little price comparison online and a few clicks I found myself owner of some genuine, made in China (?) Eames shell replica's. Yee-haw?

Once they arrived I just had to attach the legs to the shell. They went together easily with plenty of tolerance given for screw alignment. They seem to be holding up so far, but will they stand the test of time?

UPDATE:
Not so much. Only a few months into owning them, the screws that attach the base to the chair are coming loose. That didn't take long. Hopefully this isn't the case with all knockoff's. For many most people out there, buying new licensed (or even some non-licensed) reproductions is not a viable option.

As much as I'd like to buy original, the price seems a bit over inflated for me. Not to mention having to choose molded plastic over the previous fiberglass models hurts a little. Most of this stuff was designed with intentions of being stylish and affordable for the middle-class mid-century family, yet the current prices don't always seem to reflect that. The best option for me (and most others) is to keep an eye on Craigslist, Estate sales, antique shops, etc. for vintage finds. In many cases, the quality is better than current reproductions. Even if you need to put a little elbow grease into it to get it looking good again.

baseboard bliss


Bliss my a**. Angie titled this post. Had she spent as much time on this project as I did, the title wouldn't sound so pleasant. Anyway, I had an extra gallon of white paint lying around so I decided on a whim to start painting baseboards this past week. Had I known how little fun it would turn out to be I may have never started, however the end result is well worth the trouble when trying to update outdated boards to something more modern. If you're considering taking this on, here's a few pointers that may help.
  • If possible, paint the baseboards BEFORE painting the wall. Save tape and time touching up the top of the boards.
  • Use a semi-gloss or gloss paint. I tend to lean towards the  more matte look. For baseboards you want something easy to clean when it gets scuffed. IT WILL GET SCUFFED, whether it's your shoes or your vacuum cleaner. The problem with using a matte paint for baseboards is that once they get scuffed, the only way to fix it is to apply more stupid paint. Using a semi-gloss or gloss paint provides a better surface finish for cleaning.
  • Use a 3" or smaller roller on the main face of the baseboard to speed up the process, and follow in behind with a 1" or 1.5" brush on the top and bottom.
  • When painting baseboard on carpet use a 3" tape and place the tape so that 1/4" of the tape is on the face of the baseboard. Then use a credit card/drivers license/something else thin and rigid to slide the 1/4" of tape under the baseboard.
  • There's a chance that when the baseboards were initially nailed to the wall no one came in behind and filled the finishing nail holes with wood filler. Instead of filling the holes before your first coat, try putting one coat of paint on first. If you try filling them first, you're bound to find more holes once the baseboards are a lighter color. Then just hit the spots with a light sanding before you apply the next coat. I applied 3 coats total.
Hope this helps. All in all, the project really wasn't that much of a pain. Just some carpet burns on my knees and elbows for a week. Keep the end result in mind and you'll get through it just fine. Sore back and all.


5.12.2012

hidden treasures

Since I'm a bit late starting this blog I'm just going to post a bunch of stuff I've found/restored (all from craigslist) to play catch up.


This dresser was something I couldn't pass up. I started throwing money at my screen the minute I saw it, but nothing happened! It's still one of my favorite CL finds to this day. Incredible wood-work and detail. I couldn't find any markings or company names to track it's origin and the sweet old lady I bought it from was oblivious to the info as well. Any ideas?


I was able to get a pair of these vintage orange-leather upholstered Eames shell chairs from an estate sale that was posted on CL. Neither were in great shape so I sold one and did the best I could at restoring the fiberglass shell on the one I kept with a rigorous sanding and many coats of penetrol.


I had to argue, lie, and use a fake name to land these Bertoia knock-off's for $200. 

On a side-note this pic was taken in my basement, which was our first big painting project. I wanted something dark for the man-cave. Something bar-ish. Something manly. Something made by Disney. The color is galaxy-black from the Disney paint collection. The picture doesn't do it justice. It's literally the same color as staring up into the clear night sky far from any city lights. If I had to describe it I'd have to say it's black with a slight green-blue tint.


Blue-upholstered Herman Miller DCM chair for a measly $60. Not much of a story here. Standard CL transaction. 

5.09.2012

my weakness for craigslist

Think somebody can't/shouldn't furnish a house entirely with Craigslist finds? Watch me. No matter what the day entails, how late it is, or how tired I am, I ALWAYS make time to check Craigslist for random finds before I pass out at night. Take the item below for example.


Found this IKEA PS Cabinet on Craigslist. I definitely went through an IKEA phase. It doesn't hurt to have some Ikea pieces here and there, but I don't want my room to look like a page out of the Ikea catalog. Lucky for me, I was able to get the outer shell of this dude powder-coated for free through my job. Then just a can-o-spray paint later...


Total cost: $20-25

hi, my name is tyler, and i'm addicted to eames

Thanks to Herman Millers generous discount offered to the architecture/design field, I can FINALLY afford to buy some furniture I have had my eye on for years. Not to mention, maybe get rid of all these foreign-made cheap knock-offs. You will come to see that I have an obsession with mid-century modern style and furniture. One guy I've been pining over is the Eames LCW. Feast your eyes on this sexy beast.


I. CAN'T. WAIT.

If interested in architecture, product design, etc. I would HIGHLY recommend researching the history of Charles and Ray Eames and their impact on not just the furniture market in the 50's forward, but also movie production and even the armed forces.

let there be light


One evening while walking back to our vehicle after a baseball game *GO CARDS* I spotted these guys hanging in an office building. This was probably my first realization of the impact a lighting fixture can have on its surrounding environment. It's one of those things that I never thought about until these guys slapped me across the face. You can check more of them out here.

5.08.2012

move in day!

We closed on the house January 27, 2011. As we took the last load from the apartment we sadly said goodbye to the place we called home for almost 5 years... Just kidding! I packed up as fast as possible, squealed the tires out of that parking lot and gave them a farewell finger. That place was MISERABLE. But that's a another long story. Onward and upward, right?

So upon arrival to the new place I ran inside to take some quick "before" pictures before we threw our stuff everywhere. So without further ado... here ya go (in no particular order). Please excuse the noisy, cool-toned pictures. All I had available to take pictures with (and still) was an iPhone.

Laundry room right inside side entrance. Gas hook-up for dryer.


Kitchen was recently remodeled. Also, new windows throughout the house all with almond-color framing...WHY?!

Kitchen from living room. Those cabinets are going to need some handles.

Living room from kitchen. Paint the fireplace and mantle? And again with the almond windows...


Front door and window in living room.


Bedroom #1


Bedroom #2


Master bedroom


Cramped master bath


Main floor bath


Basement sink... outside the bathroom. So I can make sure you wash your hands?


Basement closet

Basement bath


Storage room/soon to be shop

getting started

This is it... here I go. Delving into the world of blogdom. This blog was created for the purpose of capturing the adventures of owning my first home and transforming it into something special. Simple enough.